I have been itching to do a chalkboard wall for about a year. Through moving, then renting, then waiting for our house to be built… the time is finally here!!
I wasn’t exactly sure where we would put our chalkboard wall, since our house doesn’t really have a “mudroom” or secluded entry area. I was also torn on whether I wanted a chalkboard wall for my own purposes, or for the little ones to play with. Since our wall options are limited, I decided to go with a wall for myself, for now. But, there is some room at the bottom where the littles can have some fun (if they can learn the difference between a chalkboard wall and a regular one!).
I was really surprised at how EASY this project was. I have to admit, I was a little hesitant when reading the warning labels on the paint can. It had the usual warnings, but there was an extra one regarding Crystalline Silica and they made a big to-do about wearing a respirator, etc. I held off for a day to weigh how risky I wanted to be. The warning labels discussed issues with lung function and cancer. I decided to just go for it. I mean… I’m sure most everything we use now-a-days can cause cancer, right down to the food we consume daily.
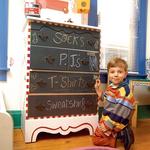
With the placement of the wall being in our breakfast area, I thought it would be perfect to use as my “menu” board. I typically go through notepads a few times a year for this purpose. Now, I have this board I can just wash off every week! (Although I do need to make a note to buy a chalk holder! Chalk is much messier than pen!). My husband was skeptical for my art capabilities (GASP- how dare him, right?!) to design a board that looked appealing, so I decided to prove him wrong… with some help from a tutorial and my computer! 🙂

This tutorial I found on Indie Craft Parade was genius! I just have a few helpful hints I found while doing this:
1) Make sure to only chalk exactly (if you can) over where the letters are. Otherwise, as the side of you hand rests on the paper, you will leave chalk spots behind.
2) Use Q-tips to clean up your lines. I am the newest beginner at this, and I read somewhere that Q-tips are great for giving clean lines, and they totally are!

I literally only needed two things… well three, if you count my stencil to cheat 🙂
1) Chalkboard paint. I picked up Valspar at my local Lowes
2) Frog Tape (if you are taping on a wall that needs to be separated. FYI- I LOVE Frog Tape- seriously the best job a tape has ever done!!!)
3) Stencil (of if you’re lucky, your beautiful, creative handwriting)
4) Paintbrush
OK… so you really need 4 things I guess… and a paint can opener and stirrer… but I think all of those things are kind of givens, right?!